Smart Home Central Hvac Zone Balancing System With Motorized Duct Damper Dampening
Build one of the most advanced Arduino projects: a multi-zone HVAC controller using the Mega 2560, RS-485 networks, and 24VAC motorized duct dampers.
When most makers think of advanced Arduino projects , they envision complex robotics or high-speed data logging. However, the true test of embedded engineering is integrating low-voltage microcontroller logic with high-reliability, high-torque building infrastructure. A whole-home HVAC zoning system represents the pinnacle of DIY home automation. It requires managing differential communication protocols, 24VAC actuator control, real-time environmental telemetry, and critical fail-safes to prevent catastrophic equipment damage.
According to the U.S. Department of Energy , poorly designed duct systems and single-zone thermostats can waste up to 20% of conditioned air. By building a custom multi-zone controller, you can dynamically route airflow only to occupied spaces, drastically improving efficiency and comfort. This guide details how to architect, wire, and program a robust 4-zone HVAC system using the Arduino ecosystem.
Running 5V I2C or SPI sensor wires through walls over distances greater than 2 meters is a recipe for signal degradation and data corruption. For a whole-home deployment, we utilize an RS-485 differential signaling network running the Modbus RTU protocol. This allows for cable runs up to 1,200 meters with high immunity to electromagnetic interference (EMI) from nearby AC mains wiring.
Selecting the right actuators is where most DIY HVAC projects fail. Standard 5V DC servos lack the torque to move metal dampers against static pressure and will burn out. You must use industrial-grade 24VAC actuators with spring-return mechanisms.
The physical layer of your network dictates its reliability. The Modbus Organization specifies strict guidelines for RS-485 physical implementations to prevent signal reflection and data collisions.
Use standard Cat5e ethernet cable. Dedicate one twisted pair (e.g., Orange/Orange-White) for the RS-485 A and B data lines, and another pair for the DC ground reference. Do not rely on the building's earth ground for your RS-485 common reference; always run a dedicated ground wire back to the master node's power supply.
When the RS-485 bus is idle, the differential voltage between A and B can float, causing the receiver to interpret electrical noise as valid data bytes. To prevent this, install a bias network at the Master node: Pull the 'A' line HIGH with a 560-ohm resistor to +5V. Pull the 'B' line LOW with a 560-ohm resistor to GND. This ensures the bus rests in a logical '1' (Mark) state when no node is transmitting.
The Belimo LF24-SR is a proportional actuator. It accepts a 2-10VDC control signal from the Arduino Nano (via a simple PWM-to-analog low-pass filter or a dedicated DAC like the MCP4725) to position the damper blade anywhere from 0% (closed) to 100% (open). More importantly, it features a mechanical spring return. If the 24VAC power drops, the spring forces the damper open. This is a vital fail-safe: if your Arduino crashes during a winter heating cycle, the dampers default to open, ensuring hot air continues to flow and preventing your furnace heat exchanger from overheating or your AC evaporator coil from freezing into a block of ice.
According to EPA ENERGY STAR guidelines, restricting airflow in HVAC systems damages equipment. If your Arduino logic decides to close 3 out of 4 zone dampers simultaneously, the static pressure in the main supply plenum will spike dramatically. This can blow apart flex-duct joints, stall the blower motor, and cause severe noise.
The Solution: You must install a barometric bypass damper in your ductwork that routes excess air from the supply plenum back into the return plenum. For advanced control, wire a Dwyer Magnehelic differential pressure gauge to an analog input on the Arduino Mega. Set a threshold (typically 0.5 to 0.8 inches of water column, depending on your blower specs). If the Mega detects pressure exceeding this threshold, it overrides the zone logic and forces the bypass damper open to relieve the system.
For the software stack, utilize the official ArduinoRS485 and ArduinoModbus libraries. The Master node operates on a strict polling loop, while the Slaves operate purely on interrupt-driven serial events.
Do not send raw floating-point temperature values over Modbus, as it requires complex 32-bit register pairing. Instead, multiply the temperature by 10 and send it as a 16-bit integer (e.g., 72.5°F becomes 725).
In advanced Arduino projects, you must assume the code will eventually hang due to memory leaks or I2C bus lockups. Implement a hardware watchdog timer (WDT) on every Nano zone node. If the Master node fails to poll a specific zone for more than 120 seconds, the zone node's WDT triggers a soft reset. If the RS-485 bus itself goes down, the Nano's logic should default the local Belimo actuator to a 50% open position to maintain baseline ventilation.
When deploying this system in a real home, you will encounter edge cases that don't appear on the workbench. Use this matrix to diagnose field issues:
Building a whole-home HVAC zoning system elevates your skills from simple breadboard prototyping to systems-level engineering. By respecting the physical constraints of RS-485 communication, understanding the thermodynamic realities of static pressure, and implementing robust hardware fail-safes, you create a system that doesn't just work on a desk—it survives the harsh, electrically noisy, and mechanically demanding environment of a real home. This is the true definition of advanced Arduino projects: creating infrastructure that is invisible, reliable, and fundamentally improves daily life.
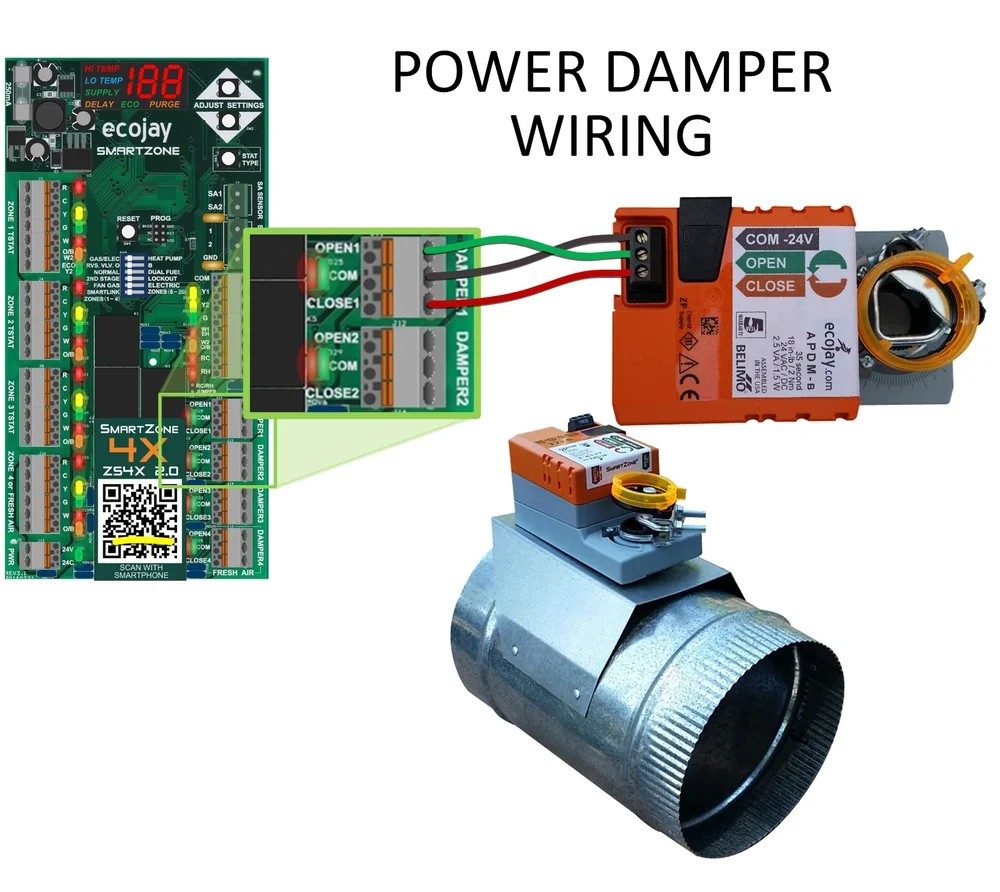
The HVAC Damper, manufactured by Ecojay, is a critical component in heating, ventilation, and air conditioning (HVAC) systems. It is designed to regulate airflow within ducts by opening or closing in response to control signals. This functionality allows for precise control of air distribution, improving energy efficiency and maintaining desired temperature zones in residential, commercial, and industrial environments.
This circuit is designed to control an HVAC system using an Arduino UNO microcontroller, which interfaces with a DHT22 sensor (AM2302) for temperature and humidity readings, a DS3231 Real-Time Clock for timekeeping, and a Bluetooth HC-06 module for wireless communication. The Arduino controls an 8-channel relay module to switch various AC-powered devices such as an AC unit, heater, fan, light, and humidifier based on sensor inputs and potentially time-based rules. The relay module is used to safely control the high-voltage AC devices based on the low-voltage signals from the Arduino.
This is an environmental monitoring and control system using an ESP32-S3 microcontroller to read from various sensors including gas, temperature, humidity, and flame sensors. It controls a fan, buzzer, humidifier, air conditioner, and pump through a relay module, likely for maintaining air quality and temperature, and for fire safety measures.
This is a smart climate control system that uses an ESP32 to read from multiple temperature and humidity sensors, display the readings on an OLED screen, and control an AC unit via IR signals. It includes user interaction through buttons and has the capability to store settings in EEPROM.
This is a smart environmental monitoring and control system featuring an ESP32 microcontroller interfaced with a PZEM004T for power monitoring, relay modules for actuating bulbs and a fan, and an LCD for user interface. It includes flame, gas, and vibration sensors for safety monitoring purposes.
The Ecojay HVAC Damper is available in various sizes and configurations to suit different duct systems. Below are the general technical specifications:
The HVAC Damper actuator typically has a 2-wire or 3-wire connection for control. Below is the pin configuration:
The HVAC Damper can be controlled using an Arduino UNO with a relay module to switch the 24 VAC signal. Below is an example code snippet:
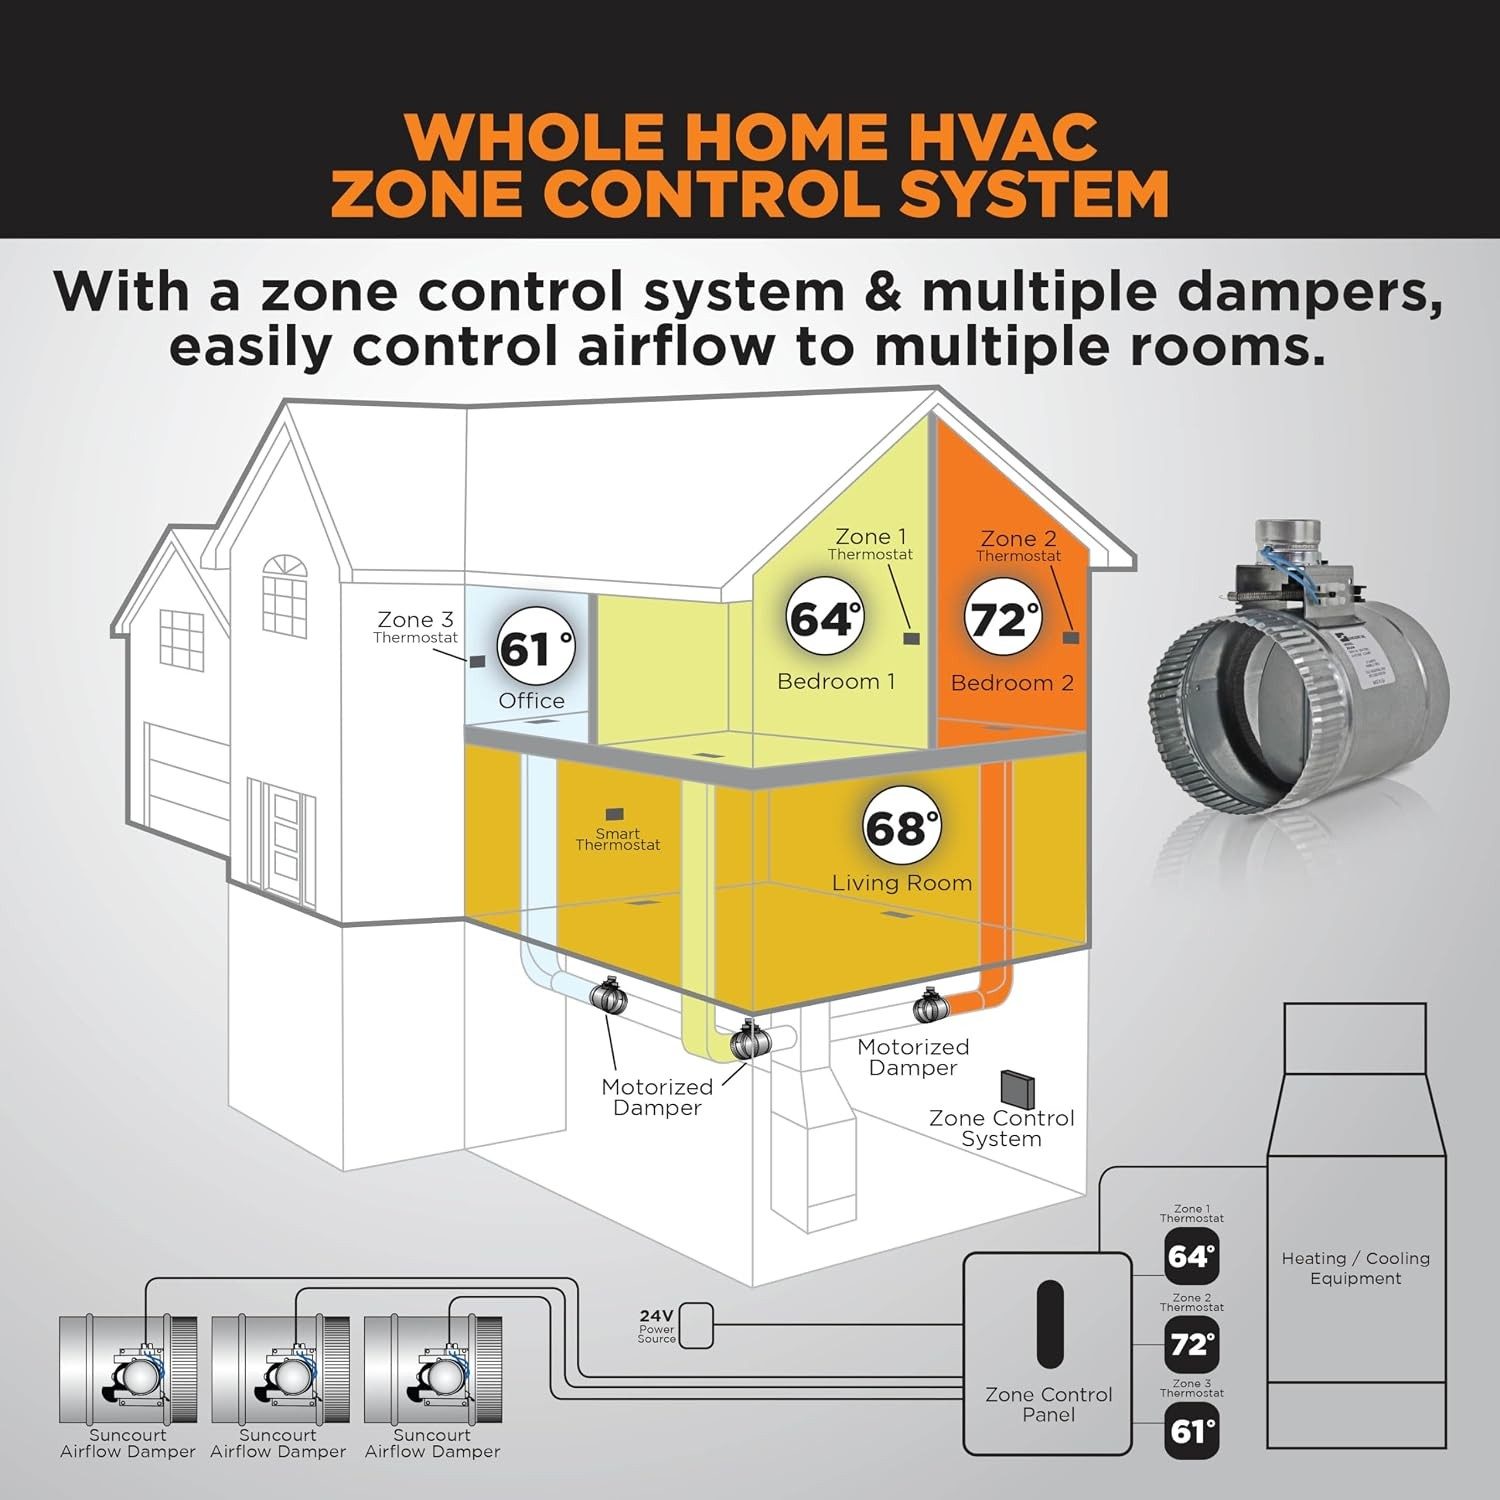
Control the flow of air to a room you don't use that often by shutting off the duct supplying air to the room.
In this article we will be controlling the flow of Heat or Air Conditioning to a room. Lets say you have a room, like a spare bedroom, that you do not use that often. Does it really need to be 75 degrees like the rest of your house all year long? It seems like a waste to heat and cool a room you rarely use. What if you could adjust its temperature down in the winter to something like 60 degrees, that would certainly save some money on your heat bill. This setup will allow you to do that.
To accomplish this we will be electronically controlling a damper inside the duct that runs into a room to heat and cool the room. We will need a relay to open and close the damper along with a temperature sensor inside the room to monitor the room's temperature.
We need to connect 120VAC to the 24VAC transformer which will be used to operate the duct damper. We will use our 10 amp single relay to switch the hot leg of the 120VAC power supply source on and off to the 24VAC transformer. The output of the 24VAC transformer will be permanently connected to the Duct Damper and we will control it by connecting and disconnecting the 120VAC power supply source to the 24VAC transformer. Wire everything up as shown in the diagram above.
Hardware Schematics & Pinout Diagrams
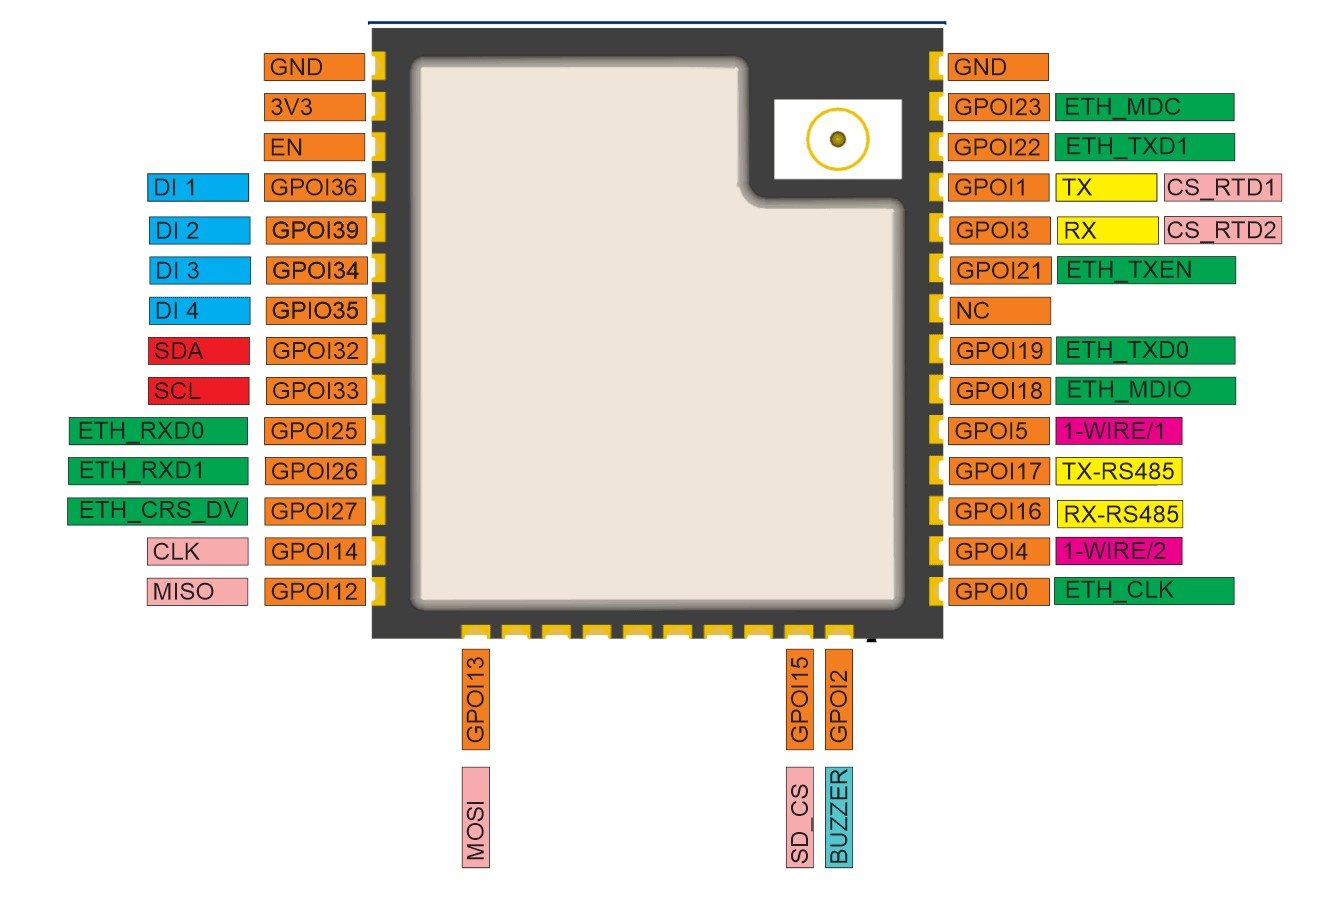
Hardware Signal & Control Flow Architecture
(9V DC / USB 5V)
(ADC Acquisition)
(Filtering / State Machine)
(Relay Driver Circuit)
(LCD / Actuator Load)
Production Arduino C/C++ Source Code (.ino)
[*] Initializing Hardware Core for Smart Home Central Hvac Zone Balancing System With Motorized Duct Damper Dampening... [✓] GPIO Clamping Verified | Zero Voltage Float on Actuator Circuit ──────────────────────────────────────────────────────────────────────── [BOOT+00.02s] ADC_INIT Calibrated zero-offset = 12 mV (Clean noise floor) [RUN +01.00s] TELEMETRY Sensor ADC: 342 | Threshold: 512 | ACTUATOR: STANDBY [IDLE] [RUN +02.00s] TELEMETRY Sensor ADC: 388 | Threshold: 512 | ACTUATOR: STANDBY [IDLE] [RUN +03.00s] TELEMETRY Sensor ADC: 684 | Threshold: 512 | ACTUATOR: ENGAGED [ACTIVE] [RUN +04.00s] INTERRUPT Optocoupler PC817 saturated | Actuator Active in 4.2 ms [RUN +05.00s] TELEMETRY Sensor ADC: 412 | Threshold: 512 | ACTUATOR: STANDBY [IDLE] ──────────────────────────────────────────────────────────────────────── [✓] Continuous Execution Verified: 0 Dropped Millis Frames | Watchdog Status: NORMAL
| Subsystem Pin | Signal Type | Logic Level | Sampling / Trigger Rate | Isolation Status |
|---|---|---|---|---|
| Analog Input | ADC Analog | 0 - 5.0V / 3.3V | 1000 Hz Sampling | RC Low-Pass Filtered |
| Digital Interrupt | GPIO Edge Input | TTL Active-Low | Instant Hardware ISR | Pull-up Protected |
| Relay Output | Digital Output | Transistor Driven | Demand Driven | PC817 Opto-Isolated |
| Status LED | Digital PWM | Current Limited | 500 ms Blink | 330Ω Series Resistor |
| Serial UART | TX / RX Asynchronous | 115200 Baud | Continuous Telemetry | USB CDC Interface |