Power Line Carrier Communication Plcc Modem For Low Cost Smart Metering Using Arduino
The PLM Breakout Board, Shield, HAT and Shahara are compatible, simple and low-cost solutions for creating a DIY IOT project or developing consumer product using power line telecommunications. The breakout board and shield are compatible with Arduino development boards. The HAT is compatible with the Rasperrby Pi single board computer. The Shahara is a compact all-in-one solution combining MCU and powerline modem circuitry on one board. These power line modem solutions are compliant with US FCC (Federal Communication Commission), Industry Canada, Japan MPT, and European CENELEC EN50065-1 regulations for signaling in the 125 kHz to 140 kHz and the 95 kHz to 125 kHz frequency bands.
The breakout board does just that, it breaks out power line modem control and power signals to a header. This provides flexibility to control PLM communications from something other than an Arduino. This PLM solution is also a cheaper, bare-bones alternate, to the shield because it does not possess the AC to DC converter. This board functions similar to the NXP OM13313-598 Demo Kit but it's a fraction of the price. Like the OM13313 Demo Kit, this board does not receive power from the same wires it communicates over. The DC power required by the breakout board components must be supplied seperate from the power lines used for communications.
Stack the shield on top of one of the many MCU development boards with the recognizable Arduino Shield footprint and you instantly have a smart node that can communicate to appliances, lighting, garage doors and sensors over thousands of feet of home 120/240 AC or DC power lines with no other wires required (nodes receive power from the same wires they communicate over). Nodes can be accessed over the internet via web browsers and or C++/Python/MATLAB/LabVIEW applications.
Plug this HAT onto any Raspberry Pi (RPI) with a 40-pin HDR (e.g. Pi 1,3,4 and Zero) and you instantly have a powerful PLM gateway to control your powerline communications network. The HAT has an onboard +5V AC/DC converter that powers the RPI and HAT digital circuitry directly from the powerline. The gateway is an single board computer making it Python developer friendly; PLM communications can be achieved using Python scripting. The gateway can be accessed over the internet via a remote desktop or SSH connection.
The Shahara is a standalone miniature PLM development board measuring 2" x 2"; perfect for embedding into DIY or prototype designs. It houses an onboard ATmega328p MCU for custom firmware development to create your custom smart home platform and or powerline smart home network. An onboard +5V AC/DC converter powers digital circuitry directly from the 120 or 240VAC input wires that the module(s) communicate over.
A DIY smart home system is one of the many things you can create with the PLM Shield. The figure below illustrates a smart home application. The Switch Node provides on/off control of appliances, lighting and or opening/closing of garage doors. The Environment Node can monitor the indoor air quality of areas within your home. The Internet Node can host a webpage that displays the environmental data, as well as, clickable buttons to control appliances, lighting or garage doors. The webpage can be accessed from any mobile phone, PC or tablet connected to the internet; allowing you to access your DIY smart home network from inside your house or while your away.
Internet Node: Ardunio UNO + PLM Shield + Ethernet Shield creates a node that can be controlled from outside of your home over the internet, host server applications to report data to a website for remote monitoring.
Environment Node: Ardunio UNO + PLM Shield + Adafruit BME680 Breakout creates a node that can monitor temperature, pressure, humidity and VOCs in a room/area within your home.
Switch Node: Ardunio UNO + PLM Shield + Relay Shield creates a node that can switch on/off AC appliances (e.g. fan, light, motor or high current DC actuators like solenoid valve)
In homes, outlets are typically on different circuits and or on different legs of a center tapped transformer depending on the amount of AC voltage the outlet is meant to deliver. Here's a video explaining the basics of home electrical wiring . Powerline communications cannot be achieved over an infinite distance, it has it's limitations, because of this one may find that communications may be achievable between two adjacent rooms but not between outlets that are in rooms further apart. The JARViE PLM Shahara is the solution to achieve powerline communications between outlets on electrical circuits seperated by longer lengths of wire. The diagram below illustrates how to implement the solution by forming a JARViE PLM repeater.
The following diagram illustrates how the PLM Shield should be connected to a DC power line. In this diagram, the DC power source can be a switch-mode power supply, solar panels with converted DC output, batteries, super capacitor, etc. The DC power source should not exceed +35 VDC.
When using a switch-mode power supply, it is best to filter the output to achieve the best powerline telecommunications. L1 = 100 uH and C = 470 uF is a low-pass filter that prevents power supply noise from interfering with powerline communications. The filtering components are likely not required when using batteries or capacitors as the power source.
The impedance of C decreases as freq. increases so a choke ( L2 = 100 uH) is recommended to prevent the capacitor from overloading/shorting the 120 kHz powerline communications. Using batteries and capacitors as the DC power source will have the same overloading affect, so a choke is recommended for these sources as well.
Communicate to PLM Network by creating a user interface. The following UI is an example that was developed using Python. The application communicates with any PLM device in the network that has an IP address and that can send/receive messages using UDP packets (User Datagram Protocol). The Python application is located in this repo at Firmware->Shield->Examples.
The TDA5051 powerline modem on the JARViE demo boards provides a representation of its on-chip oscillation frequency (fosc) to its CLK OUT pin at a frequency of fosc/2. This signal can be supplied to the PLM host controller or external peripheral for system syncrhonization, PLM operating frequency verification, etc.
All JARViE boards are set to brodcast powerline communications at 125 kHz. Here's a spectrum capture of a PLM Shahara plugged into a home outlet in North America. Note the signal magnitude at 125 kHz. Also realize the signal magnitudes at other frequencies relative to the communications frequency. For good powerline communicaions, the SNR (signl-to-noise ratio) of the communications frequency compared to surrounding frequencies (communications +/- 200 kHz) should be as large as possible.
The following image shows the DATA_IN to Tx carrier output delay. The blue trace is a 1 kHz square wave driving the PLM's TDA5051A modem DATA_IN input. The yellow trace is the modulated ASK carrier wave transmitted to all PLMs on the power line network. The capture shows that there is approximately a 170 microsecond delay between setting the DATA_IN input and Tx carrier wave generation.
The following image shows the Rx carrier input to DATA_OUT output delay. The blue trace is the modulated ASK signal received through the AC inputs on the JARViE PLM. The yellow trace is the digital TDA5051A DATAOUT signal that can be interpreted with an MCU or equivalent UART compliant device. The capture shows that there is approximately a 180 microsecond delay between Rx carrier wave reception and the DATAOUT output.
The main purpose of the PLM zero cross detection circuitry (ZCD) is to provide a method to synchronize devices to one another. The intent is to not have to share a clock between devices that are meters away. The output of the ZCD goes from 0 to +5V making it compatible with MCUs. By pairing the PLM with an MCU, the ZCD output can be used to trigger event timers, create task schedulers within a PLM network and or send messages when noise on the power line is smallest for best communication results (zero crossing point). The ZCD can also be used to measure the frequency of the AC power line.
Powerline modem technology is being used in the solar, oil and gas and irrigation industries just to list a few. E-mail hilljarvis@gmail.com if you're interested and or need help planning, reviewing, designing, developing and or deploying a custom powerline modem device and or powerline communications system.
Hardware resources and Arduino library for JARVIE Power Line Home Automation Modem
Power-line communication (PLC) carries data on AC or DC wires. It works by adding a modulated carrier signal to the wiring system. the power distribution system was originally intended for the transmission of AC power at typical frequencies of 50 or 60 Hz, it has only a limited ability to carry higher frequencies, but for some applications such as the sensor monitoring in smart-home, thatâs enough.
The Maduino Power-Line Communication(PLC) module has an onboard Atmega328p MCU for custom firmware development in the popular Arduino and Atmel Studio development environments; enabling one to create a custom smart home device and or powerline smart home network. For the power-line communication, it is based on the NXP TDA5051A modem which allows all three devices to communicate with one another when placed on the same power bus. The TDA5051 sends/receives data to/from the AC line and communicates with Atmega328P with standard serial communication(1200 band by default). This technology enables applications including but not limited to: lighting control, home appliance control, energy/heating control, and up to 3,000 feet data
Hardware Schematics & Pinout Diagrams
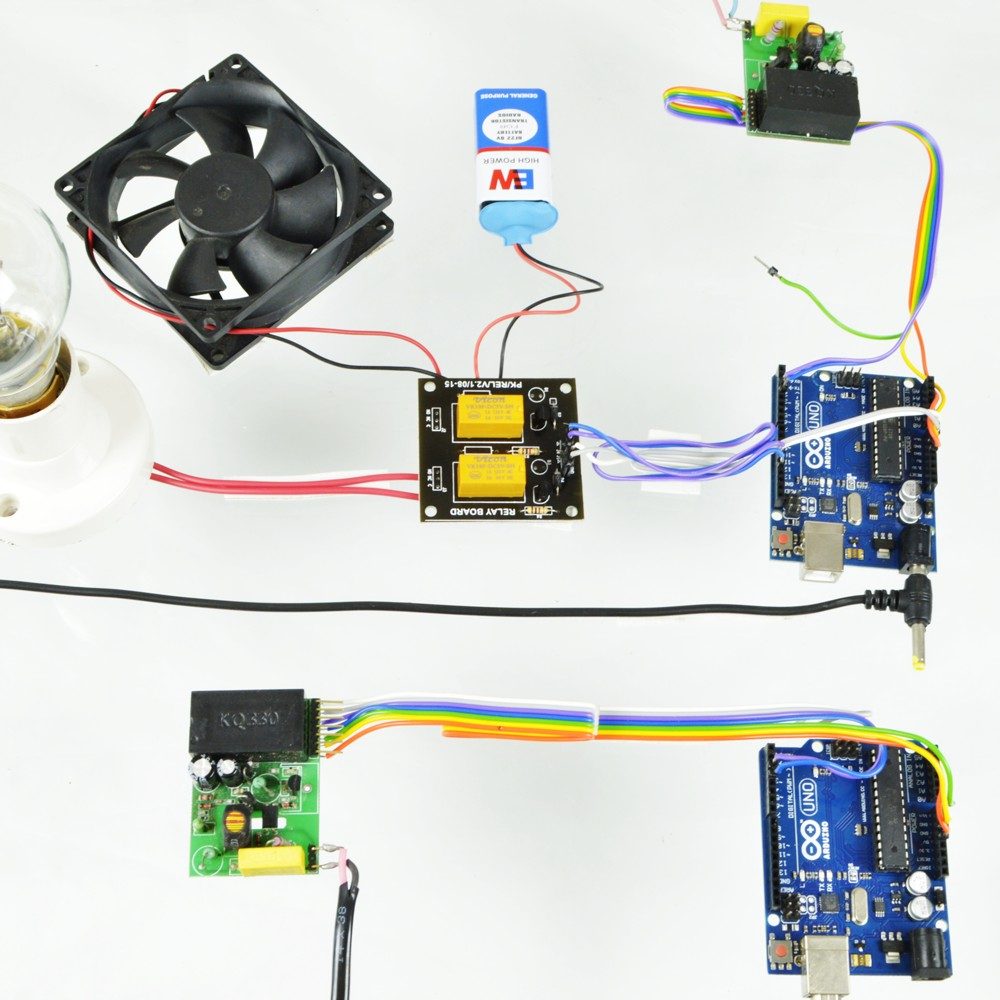
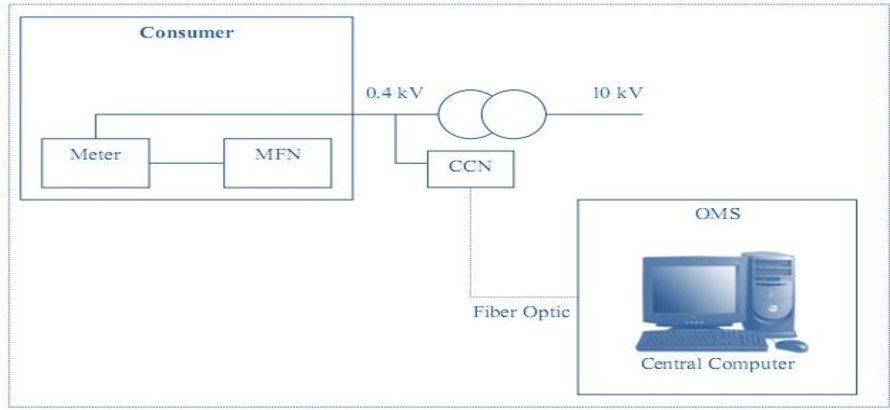
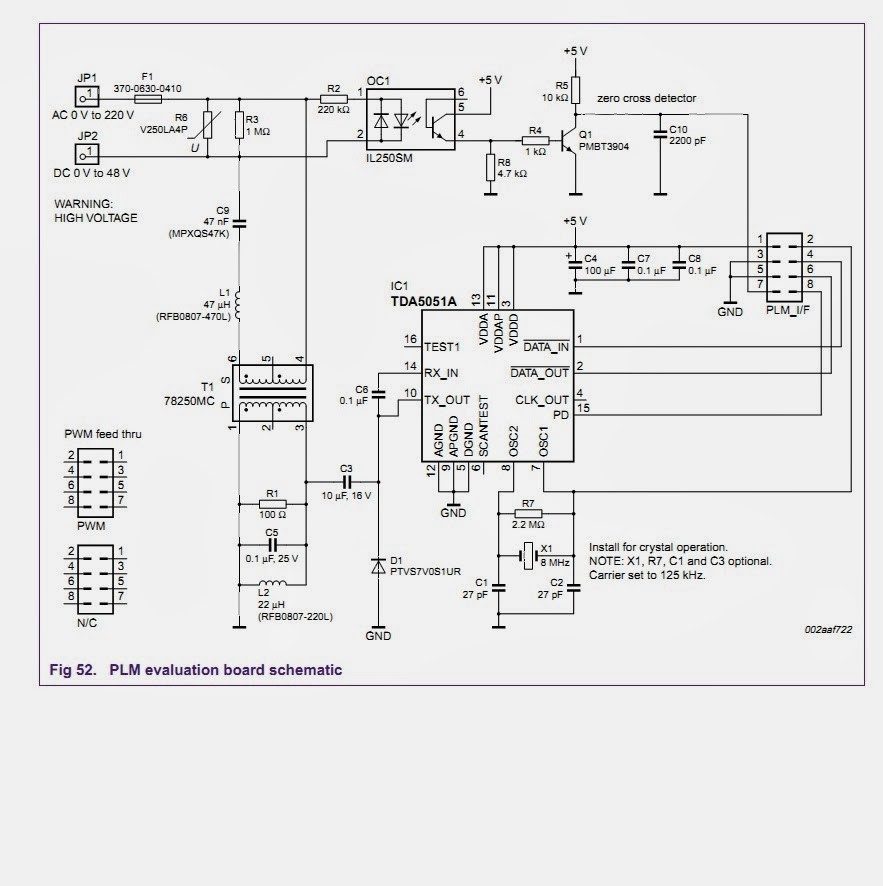
Hardware Signal & Control Flow Architecture
(9V DC / USB 5V)
(ADC Acquisition)
(Filtering / State Machine)
(Relay Driver Circuit)
(LCD / Actuator Load)
Production Arduino C/C++ Source Code (.ino)
[*] Initializing Hardware Core for Power Line Carrier Communication Plcc Modem For Low Cost Smart Metering Using Arduino... [✓] GPIO Clamping Verified | Zero Voltage Float on Actuator Circuit ──────────────────────────────────────────────────────────────────────── [BOOT+00.02s] ADC_INIT Calibrated zero-offset = 12 mV (Clean noise floor) [RUN +01.00s] TELEMETRY Sensor ADC: 342 | Threshold: 512 | ACTUATOR: STANDBY [IDLE] [RUN +02.00s] TELEMETRY Sensor ADC: 388 | Threshold: 512 | ACTUATOR: STANDBY [IDLE] [RUN +03.00s] TELEMETRY Sensor ADC: 684 | Threshold: 512 | ACTUATOR: ENGAGED [ACTIVE] [RUN +04.00s] INTERRUPT Optocoupler PC817 saturated | Actuator Active in 4.2 ms [RUN +05.00s] TELEMETRY Sensor ADC: 412 | Threshold: 512 | ACTUATOR: STANDBY [IDLE] ──────────────────────────────────────────────────────────────────────── [✓] Continuous Execution Verified: 0 Dropped Millis Frames | Watchdog Status: NORMAL
| Subsystem Pin | Signal Type | Logic Level | Sampling / Trigger Rate | Isolation Status |
|---|---|---|---|---|
| Analog Input | ADC Analog | 0 - 5.0V / 3.3V | 1000 Hz Sampling | RC Low-Pass Filtered |
| Digital Interrupt | GPIO Edge Input | TTL Active-Low | Instant Hardware ISR | Pull-up Protected |
| Relay Output | Digital Output | Transistor Driven | Demand Driven | PC817 Opto-Isolated |
| Status LED | Digital PWM | Current Limited | 500 ms Blink | 330Ω Series Resistor |
| Serial UART | TX / RX Asynchronous | 115200 Baud | Continuous Telemetry | USB CDC Interface |