Autonomous Solar Powered Drip Irrigation System With Soil Matric Potential Feedback Using Arduino
An Arduino-based smart irrigation system that automatically waters plants based on soil moisture levels while utilizing solar energy as the power source. The system continuously monitors soil moisture, controls a water pump through a relay, and displays real-time information on an LCD.
The Smart Solar Plant Watering System is an IoT-based automation project designed to reduce manual watering and conserve water.
A soil moisture sensor continuously measures the moisture content of the soil. When the moisture level falls below a predefined threshold, the Arduino activates a relay to turn on the water pump. Once the soil reaches the desired moisture level, the pump is automatically switched off.
The system is powered using a solar panel, making it suitable for sustainable and energy-efficient irrigation.
The complete Arduino-based irrigation system designed in Tinkercad integrates the soil moisture sensor, LCD display, relay module, solar panel, and water pump.
When the soil moisture falls below the configured threshold, the relay activates the water pump automatically.
Once sufficient moisture is detected, the relay switches off the water pump to prevent overwatering.
The LCD continuously displays the current moisture percentage and motor status, providing real-time system feedback.
The relay will automatically control the water pump according to the configured moisture thresholds.
Arduino-based smart irrigation system using a soil moisture sensor, solar power, relay-controlled water pump, and LCD monitoring designed in Tinkercad.
In this post I will show how to construct an automated water irrigation system for small garden using arduino and soil moisture sensor .
The proposed system can monitor the soil moisture level and when soil moisture goes below preset value, the 12V DC pump will be triggered for predetermined period of time. The status of the soil moisture level and other functions of the system can be monitored via 16 x 2 LCD display in real time.
It is estimated that there are 3 trillion trees across the globe which is greater than the number of start in our home Milky Way galaxy which is estimated to be 100 billion. But, we humans cut countless number of trees to fulfil our basic needs to luxury needs.
Mother Nature is designed with a feedback system, when a species introduces huge disturbances, nature will wipe the species out of existence.
Human beings were disturbing the nature unknowingly for centuries but, even after great development in science and technology the rate of disturbance haven’t reduced.
Climate change is one of the examples, when it gets drastic enough our species won’t last long. This project take a baby step forward to preserve the nature, it can irrigate your lovely small garden without any human interaction. Now let’s get in to technical details of the project.
The heart of the project is soil moisture sensor which can sense the amount of moisture content in soil. The sensor gives out analog value and a microcontroller will interpret those values and display the moisture content.
There are two electrodes, which will be inserted in the soil. The electrodes are connected to a circuit board consisting of comparator IC, LED, trimmer resistor input and output pins.
It has 4 + 2 pins, 2 pins for electrode connection and rest of the 4 pins are Vcc, GND, digital output and analog output. We are going to use only the analog output pin for sensing soil moisture. Since we are not using digital output pin, we will not be using on-board trimmer resistor to calibrate the sensor.
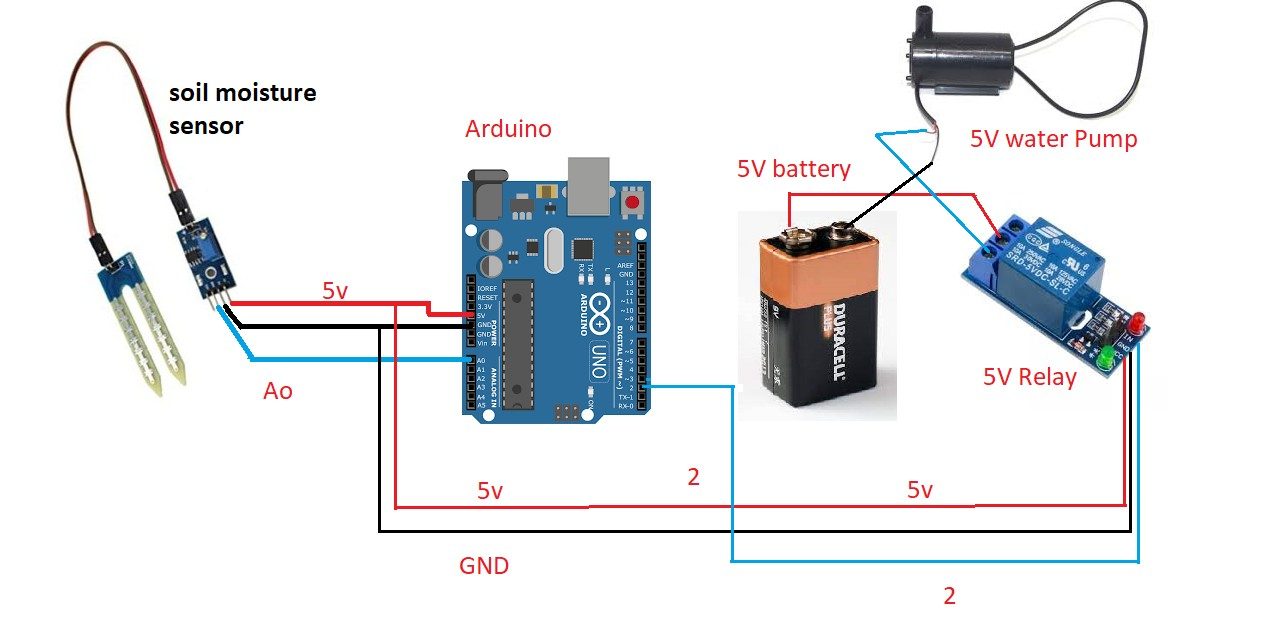
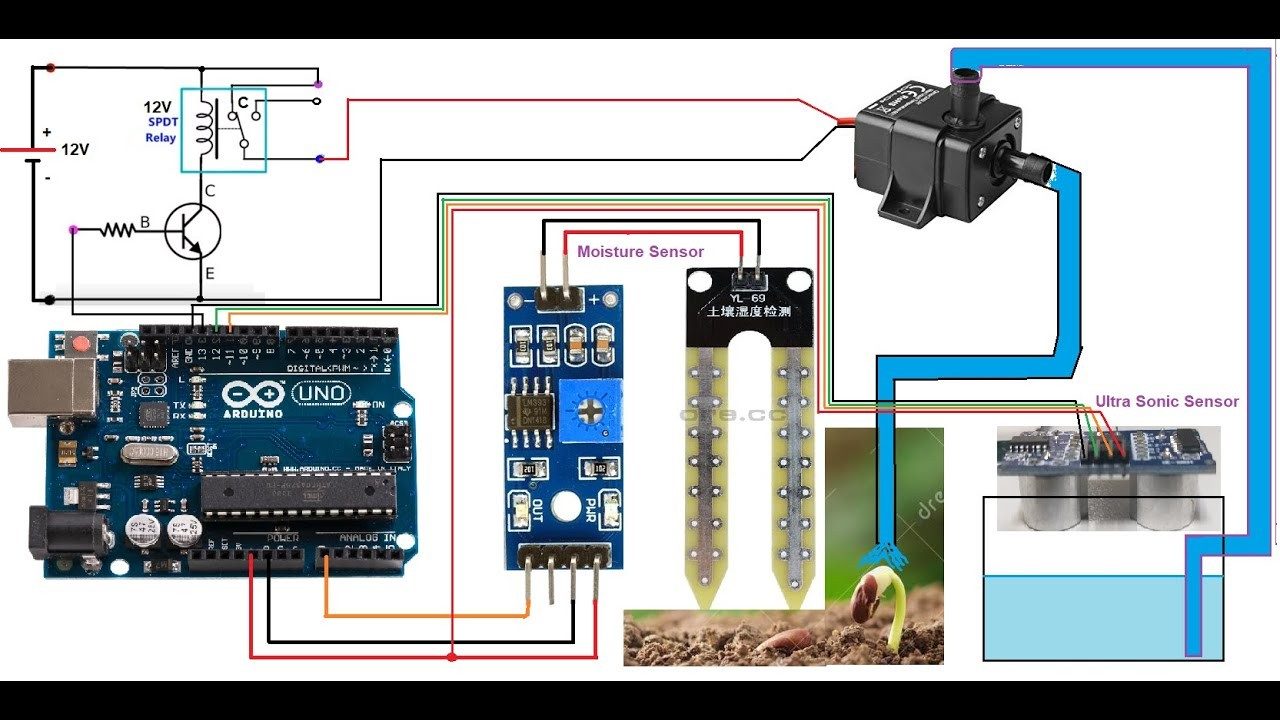
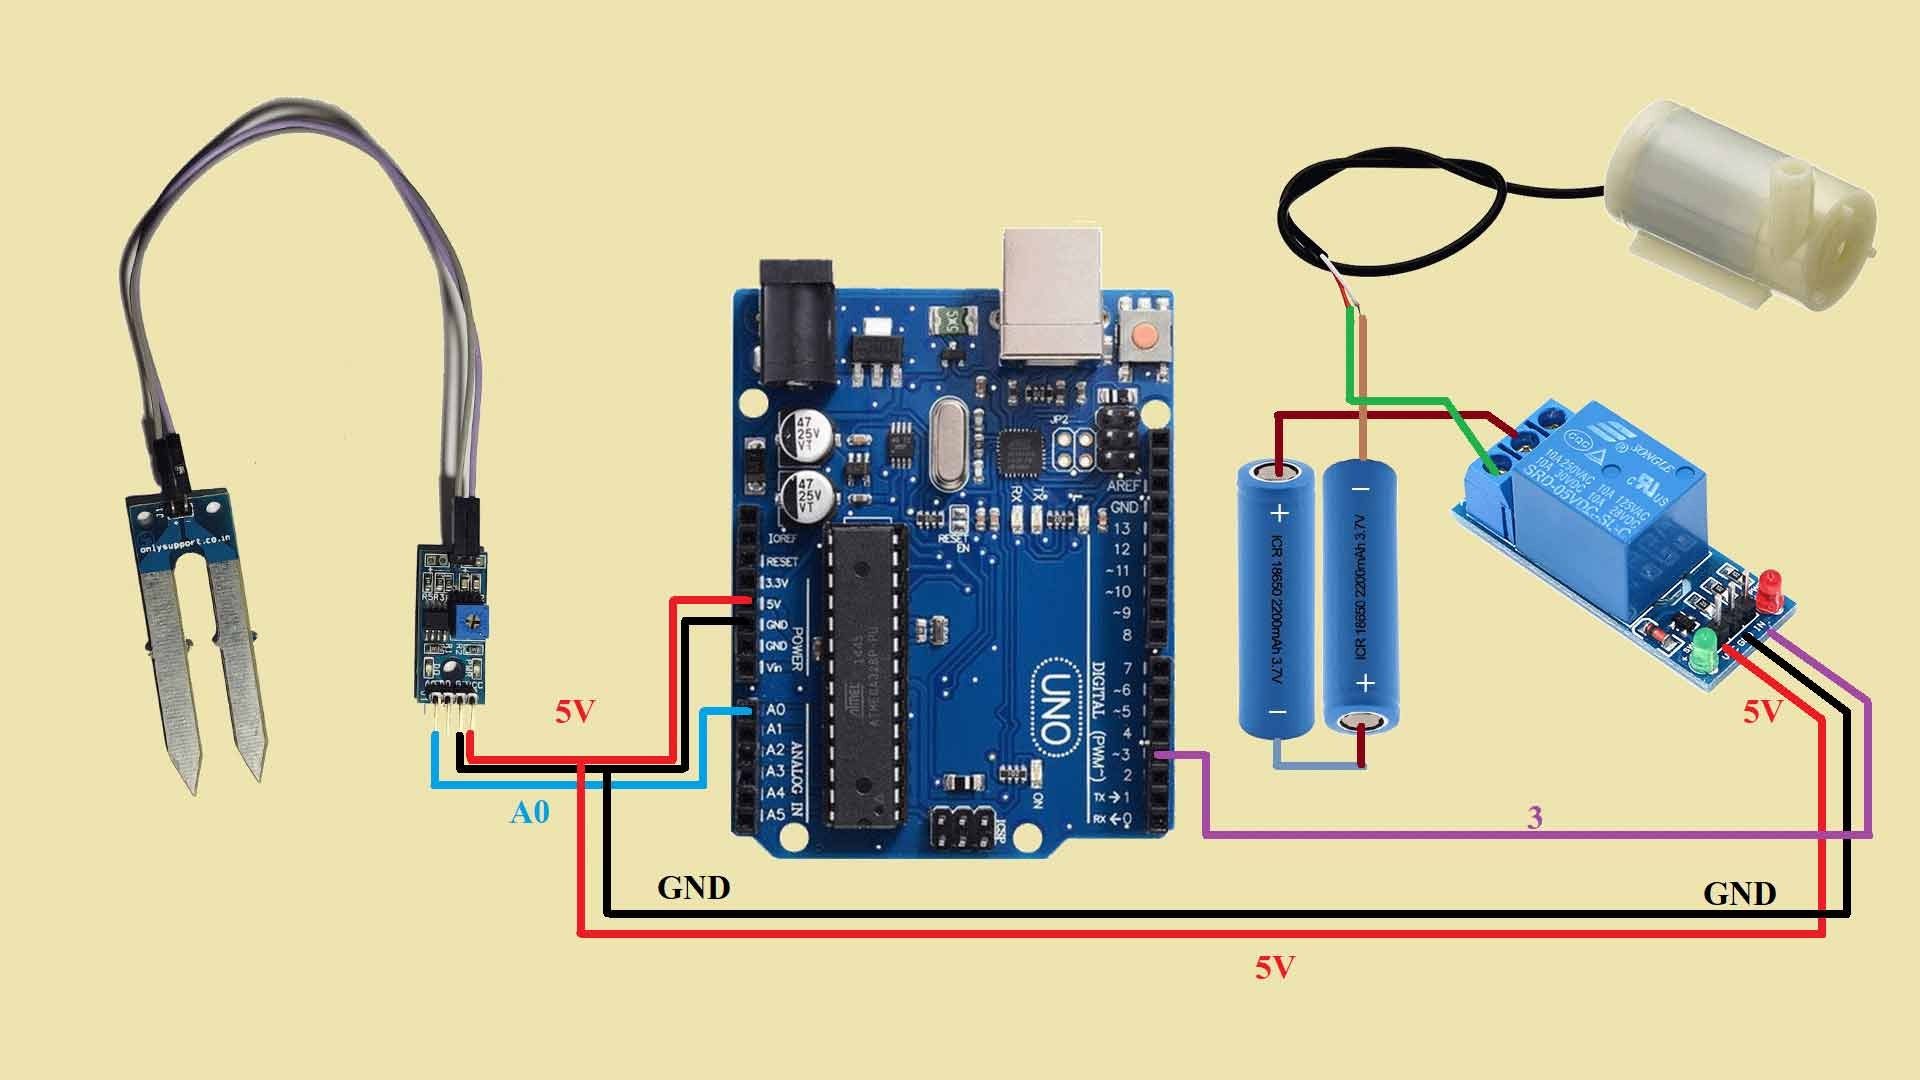
The circuit is kept fairly simple and beginner friendly. The schematic is divided into two parts of the same project to reduce confusion while duplicating the project.
The above schematic is the LCD to arduino wiring. A 10K potentiometer is provided to adjust the contrast of the LCD display.
Here is the rest of the schematic consisting of soil moisture sensor, 12V DC pump , a calibrate push button and 12V (1 - 2 amp) power supply. Please use a power supply at least greater than 500mA of 12V DC pump’s current rating.
The MOSFET IRF540N (or any equivalent N-channel) is used instead of BJTs to improve the overall power efficiency of the system.
The pump will water you small garden, make sure you always have adequate amount of water is available.
• With completed hardware, insert the electrode on soil, somewhere at the path of water flow. • Now change the two values in the program 1) The amount of time will take to water all the plants (in minutes). 2) Threshold level below which the arduino triggers the pump. You can set the percentage values 80, 70, 60, 50, 40, 30, 20 only.
int Time = 5; // Set time in minutes int threshold = 30; // set threshold in percentage 80, 70, 60, 50, 40, 30, 20 only.
• Upload the code to arduino and power the circuit. It will display “pour water and press calibrate”. Now you have to manually water your garden to sufficient level. • After watering the garden, press the calibrate button. This will determine the conduction of electricity in fully moisture soil and snap shot the reference value. • Now the system is ready to serve your small garden. Please try to add a power backup for this project. When the power fails the reference calibrated value will be wiped out of memory and you will have to calibrate the system again.
Once the pump is turned ON, it will display remaining time to turn off (in seconds).
I am an electronics engineer and doing practical hands-on work from more than 15 years now. Building real circuits, testing them and also making PCB layouts by myself. I really love doing all these things like inventing something new, designing electronics and also helping other people like hobby guys who want to make their own cool circuits at home.
And that is the main reason why I started this website homemade-circuits.com, to share different types of circuit ideas..
If you are having any kind of doubt or question related to circuits then just write down your question in the comment box below, I am like always checking, so I guarantee I will reply you for sure!
Swagatam, hello. How are you, how are your health, how are your loved ones? You helped me somehow – for FREE! You help everyone for free, you have a kind heart, thank you very much! I have a suggestion! I am doing several projects. The Smart Irrigation project is almost ready, I made two options, based on the Siemens Logo 8 controller and a multi-level soil moisture sensor on the FC-28 relay module. https://drive.google.com/file/d/1sdRwCyhOuoXGOuvZODJJpTm_N-n0EFMW/view?usp=sharing – here is a full description and explanations.
https://accentsjournals.org/PaperDirectory/Journal/IJATEE/2022/3/10.pdf There are several similar articles. I have already written to them, asked them a couple of questions – I hope they will answer. That is, we need specialists who know soils and agricultural technologies. In Kazakhstan, mainly specialists in grain, cotton, potatoes…. But there are very few specialists in vegetables and greens. But it seems that I found a good agronomist with extensive experience! Your article “Automatic Irrigation Circuit using Arduino” is a great job, just what we need! You can set percentage values!))) – Here we need to use a digital output, probably an optocoupler with a relay, to introduce into the existing radio relay system. That is, when the value has been reached, for example, 40%, then the MLSMS sensor does not meet the request of the controller! If it is above 40%, then MLSMS sends a signal that the humidity is still normal!
If you’ve read two irrigation options: – 1 option – there are at least 10 electrodes. Can be made on one relay module + one multi-pole switch per electrodes. – Option 2 is less consumable, i.e. 1 electrode for root up to 0.4 m and 2 electrodes for root up to 1 m.
There are a bit of problems with finances, my projects have stopped, now I am studying freelance platforms. All these small projects are part of one large project Dala Complex, with an approximate cost of $300,000. You can earn money now.
Thank you so much Dan, for your kind words! I am glad you found my suggestions helpful. I wish you all the best for your irrigation project. I hope someone in this forum will take interest in your project and help you to accomplish it… My email is homemadecircuits @gmail.com
Hallo sir I need to control an irrigation pump with three different solenoids Each time the pump is ON the relevant solenoid valve must be ON and a message to indicate the same.
Hello Francis, code customization is a premium offer from us, presently we are charging Rs.10/- per line of customized code.
Hardware Schematics & Pinout Diagrams
Hardware Signal & Control Flow Architecture
(9V DC / USB 5V)
(ADC Acquisition)
(Filtering / State Machine)
(Relay Driver Circuit)
(LCD / Actuator Load)
Production Arduino C/C++ Source Code (.ino)
[*] Initializing Hardware Core for Autonomous Solar Powered Drip Irrigation System With Soil Matric Potential Feedback Using Arduino... [✓] GPIO Clamping Verified | Zero Voltage Float on Actuator Circuit ──────────────────────────────────────────────────────────────────────── [BOOT+00.02s] ADC_INIT Calibrated zero-offset = 12 mV (Clean noise floor) [RUN +01.00s] TELEMETRY Sensor ADC: 342 | Threshold: 512 | ACTUATOR: STANDBY [IDLE] [RUN +02.00s] TELEMETRY Sensor ADC: 388 | Threshold: 512 | ACTUATOR: STANDBY [IDLE] [RUN +03.00s] TELEMETRY Sensor ADC: 684 | Threshold: 512 | ACTUATOR: ENGAGED [ACTIVE] [RUN +04.00s] INTERRUPT Optocoupler PC817 saturated | Actuator Active in 4.2 ms [RUN +05.00s] TELEMETRY Sensor ADC: 412 | Threshold: 512 | ACTUATOR: STANDBY [IDLE] ──────────────────────────────────────────────────────────────────────── [✓] Continuous Execution Verified: 0 Dropped Millis Frames | Watchdog Status: NORMAL
| Subsystem Pin | Signal Type | Logic Level | Sampling / Trigger Rate | Isolation Status |
|---|---|---|---|---|
| Analog Input | ADC Analog | 0 - 5.0V / 3.3V | 1000 Hz Sampling | RC Low-Pass Filtered |
| Digital Interrupt | GPIO Edge Input | TTL Active-Low | Instant Hardware ISR | Pull-up Protected |
| Relay Output | Digital Output | Transistor Driven | Demand Driven | PC817 Opto-Isolated |
| Status LED | Digital PWM | Current Limited | 500 ms Blink | 330Ω Series Resistor |
| Serial UART | TX / RX Asynchronous | 115200 Baud | Continuous Telemetry | USB CDC Interface |