Arduino Assisted Assistive Cane For Visually Impaired With Ultrasonic Surface Texture And Water Detection
An Arduino-based assistive device featuring obstacle avoidance and water detection. View Profile · Report Bug
This project is an IoT-based assistive device designed to help visually impaired individuals navigate safely. It uses an Ultrasonic Sensor to detect obstacles at various distances and a Water Sensor to detect puddles or wet surfaces.
The system provides real-time feedback through Vibration Patterns (Haptic) and Buzzer Tones (Audio), allowing the user to distinguish between different types of hazards intuitively.
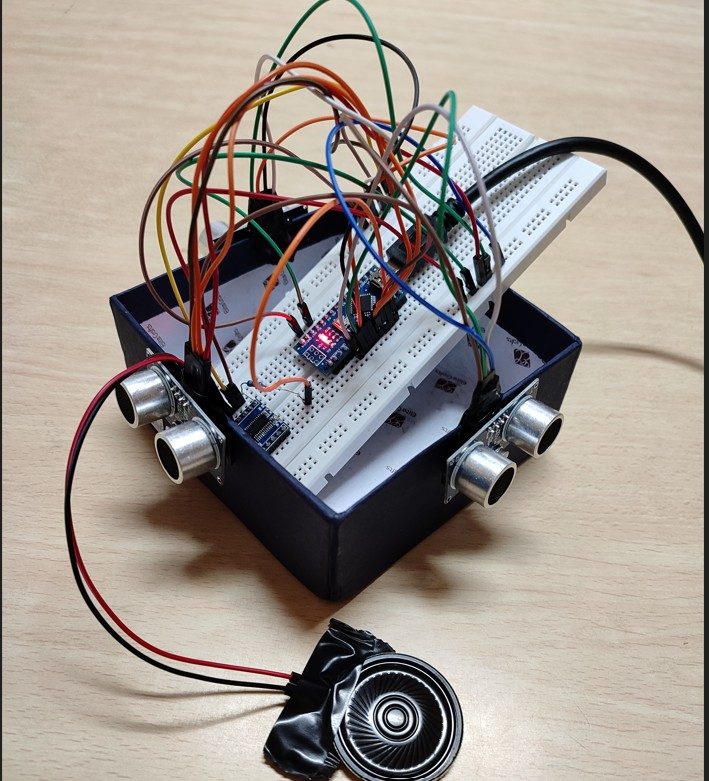
An Arduino-based Smart Cane prototype for visually impaired users, featuring ultrasonic obstacle detection, water hazard sensing, and real-time feedback through vibration and buzzer alerts.
This project is a smart assistive device designed to enhance mobility and safety for visually impaired individuals. Built using an Arduino Mega 2560 , it integrates multiple sensors and modules to detect obstacles, provide environmental feedback, and send emergency alerts.
All three contributors are engineering students who worked together on system design, code development, hardware integration, and documentation.
Smart Cane for Visually Impaired: An Arduino-based assistive device that uses ultrasonic sensors to detect nearby obstacles and water puddles. It provides real-time feedback through vibrations and a buzzer. The system can also use a speaker to read alerts aloud and integrates GPS for location tracking and navigation assistance.
Learn how to build an Arduino Nano walking stick for obstacle detection. A complete setup tutorial with wiring, code, and haptic feedback integration.
Building an arduino nano walking stick is one of the most rewarding first projects for embedded systems enthusiasts. It bridges the gap between abstract microcontroller programming and tangible, life-changing assistive technology. According to the World Health Organization , over 2.2 billion people globally have a near or distance vision impairment, making Electronic Travel Aids (ETAs) a critical area for DIY innovation.
In this setup and first project tutorial, we will construct a smart cane that uses ultrasonic proximity detection to translate physical obstacles into haptic feedback (vibration). Unlike generic LED-blinking tutorials, this guide addresses real-world engineering challenges: power management, GPIO current protection, and acoustic edge cases.
To keep the walking stick lightweight and cost-effective, we are bypassing bulky 9V batteries and standard breadboards in favor of a permanent, compact soldered build.
While the ESP32 offers Wi-Fi and Bluetooth, an ETA does not require cloud connectivity for basic obstacle avoidance. The Arduino Nano remains the optimal choice for this specific application due to three factors:
We use a 2N2222 NPN transistor as a switch, controlled by the Nano's PWM Pin 3. The 1N4007 flyback diode is placed in reverse-bias across the motor terminals to safely route inductive voltage spikes back into the motor loop when the transistor switches off.
The physical placement of the HC-SR04 dictates the success of the walking stick. If mounted too low and angled downward, the sensor will constantly detect the floor ('ground clutter'), causing the motor to vibrate continuously. Solution: Mount the sensor at waist height (approx. 90cm from the ground) and angle it 5 degrees upward . The 15-degree acoustic beam width will still catch knee-level obstacles like coffee tables and curbs without triggering on the pavement.
3D print a custom handle using TPU (flexible filament) or PETG. Embed the vibration motor directly into the grip zone using hot glue. The Nano and MT3608 boost converter should be housed in a sealed compartment near the base of the handle to maintain a balanced center of gravity.
Before connecting the battery, use a multimeter and a small flathead screwdriver to adjust the potentiometer on the MT3608 boost module. Set the output exactly to 5.1V . This accounts for minor voltage drops across the Nano's internal Schottky diode if you were to power it via the 5V pin directly.
The firmware uses the pulseIn function to measure the echo return time. We then map the distance (from 150cm down to 10cm) to a PWM duty cycle (0 to 255). As the user gets closer to an obstacle, the vibration intensity smoothly scales up.
Real-world deployment of an arduino nano walking stick reveals physics limitations that breadboard testing hides. Here is how to handle the most common failure modes:
Ultrasonic sensors at 40kHz struggle with soft, angled, or sound-absorbing materials. A heavy winter puffer jacket can reduce HC-SR04 return echoes by up to 60%, causing false negatives (failing to vibrate when approaching a person). Fix: In the code, increase the polling rate to 50Hz and implement a rolling average filter. For hardware redundancy, add a Sharp GP2Y0A21YK0F Infrared sensor, which relies on light reflection rather than sound, bypassing acoustic dampening entirely.
Vibration motors draw high current spikes. If your 18650 cell is older or has high internal resistance, this spike can cause the voltage to sag below 4.5V, triggering the Nano's brownout detection (BOD) and causing random reboots. Fix: Solder a 470µF electrolytic capacitor across the 5V and GND rails near the motor to act as a local energy reservoir during current spikes.
Thin objects like chair legs or poles may fall between the 15-degree acoustic lobes of the sensor. To mitigate this, mount two HC-SR04 sensors: one facing dead ahead, and one angled 20 degrees to the right (the side most likely to encounter doorframes and shelves). Interleave their trigger pulses in the code to prevent acoustic crosstalk.
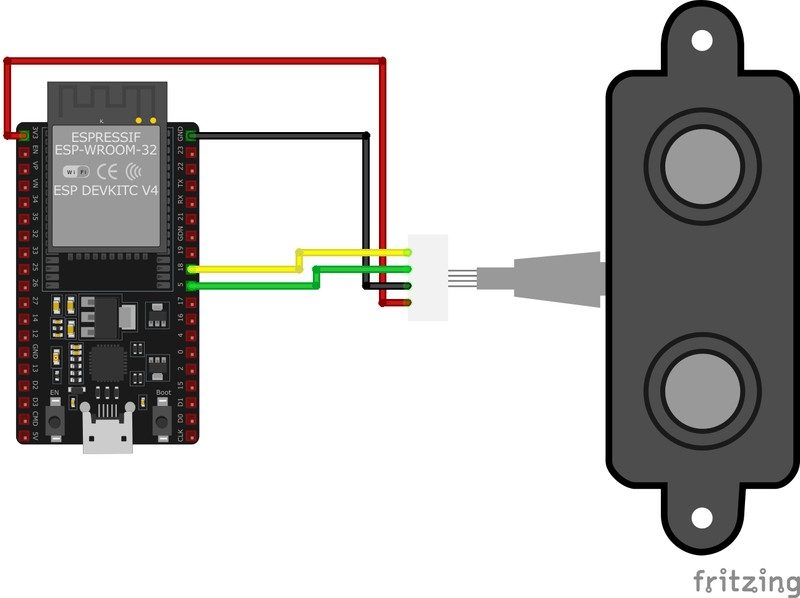
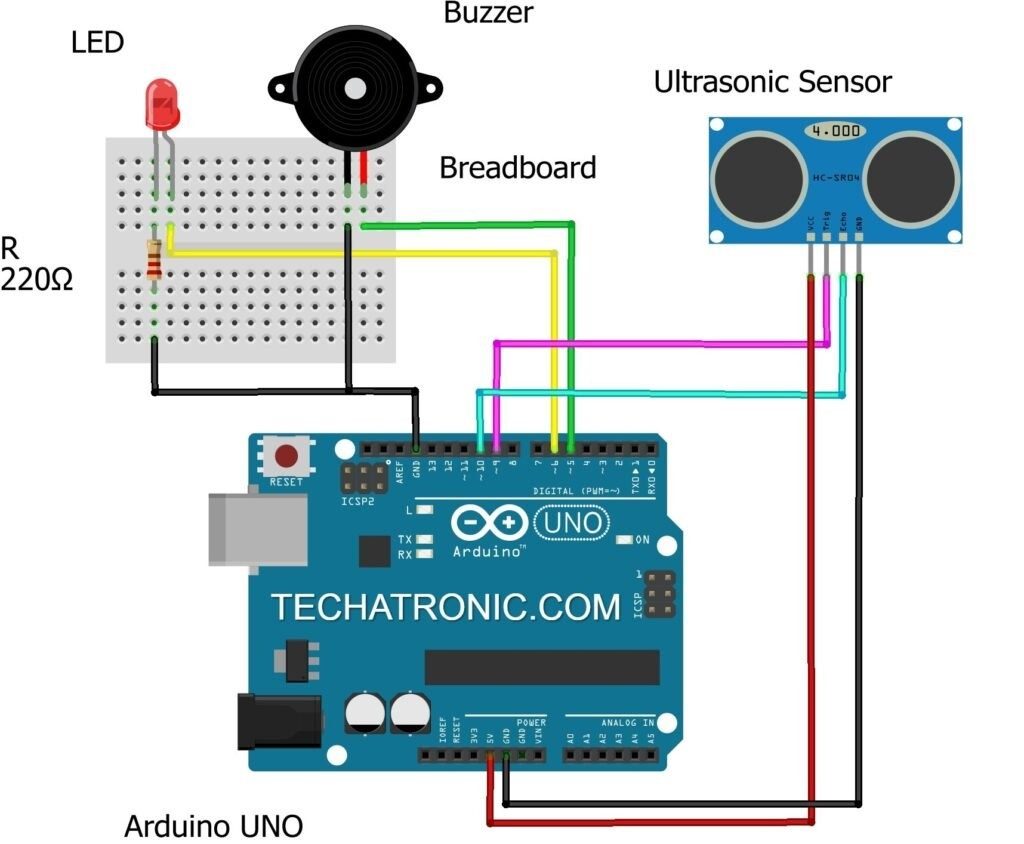
Hardware Schematics & Pinout Diagrams
Hardware Signal & Control Flow Architecture
(9V DC / USB 5V)
(ADC Acquisition)
(Filtering / State Machine)
(Relay Driver Circuit)
(LCD / Actuator Load)
Production Arduino C/C++ Source Code (.ino)
[*] Initializing Hardware Core for Arduino Assisted Assistive Cane For Visually Impaired With Ultrasonic Surface Texture And Water Detection... [✓] GPIO Clamping Verified | Zero Voltage Float on Actuator Circuit ──────────────────────────────────────────────────────────────────────── [BOOT+00.02s] ADC_INIT Calibrated zero-offset = 12 mV (Clean noise floor) [RUN +01.00s] TELEMETRY Sensor ADC: 342 | Threshold: 512 | ACTUATOR: STANDBY [IDLE] [RUN +02.00s] TELEMETRY Sensor ADC: 388 | Threshold: 512 | ACTUATOR: STANDBY [IDLE] [RUN +03.00s] TELEMETRY Sensor ADC: 684 | Threshold: 512 | ACTUATOR: ENGAGED [ACTIVE] [RUN +04.00s] INTERRUPT Optocoupler PC817 saturated | Actuator Active in 4.2 ms [RUN +05.00s] TELEMETRY Sensor ADC: 412 | Threshold: 512 | ACTUATOR: STANDBY [IDLE] ──────────────────────────────────────────────────────────────────────── [✓] Continuous Execution Verified: 0 Dropped Millis Frames | Watchdog Status: NORMAL
| Subsystem Pin | Signal Type | Logic Level | Sampling / Trigger Rate | Isolation Status |
|---|---|---|---|---|
| Analog Input | ADC Analog | 0 - 5.0V / 3.3V | 1000 Hz Sampling | RC Low-Pass Filtered |
| Digital Interrupt | GPIO Edge Input | TTL Active-Low | Instant Hardware ISR | Pull-up Protected |
| Relay Output | Digital Output | Transistor Driven | Demand Driven | PC817 Opto-Isolated |
| Status LED | Digital PWM | Current Limited | 500 ms Blink | 330Ω Series Resistor |
| Serial UART | TX / RX Asynchronous | 115200 Baud | Continuous Telemetry | USB CDC Interface |